
Kids Mode
This will turn off kids mode. Are you age 13 or older?
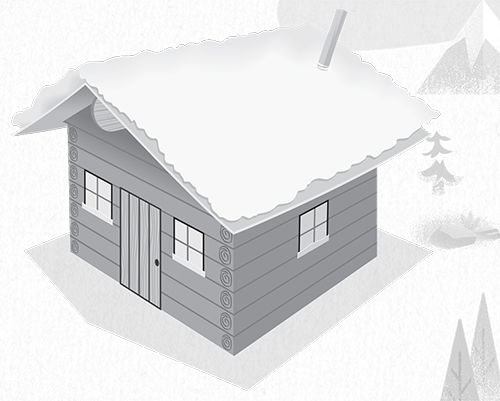
Lil’ Log Cabin (Junior)
on September 29, 2017Materials
- 4 x 4 x 3-in. corrugated cardboard boxes (see ULINE S-16725), 1 per child
- Jumbo craft sticks, 1 per child
- White poster board, one 22 x 28-in. sheet for every 12 children
- White cotton batting, one 6 x 7-in. piece per child
- Plastic drinking straws, 1 for every 2 children
- Gray or silver spray paint, amount varies
- Matthew 7:24 Verse Cards (DVD-ROM or supplemental materials download below)
- Ivory copy paper, 1 sheet for every 28 children
- Door Pattern (DVD-ROM or supplemental materials download below)
- Brown cardstock, 1 sheet for every 24 children
- Window Pattern (DVD-ROM or supplemental materials download below)
- Yellow cardstock, 1 sheet for every 12 children
- Figurines (DVD-ROM or supplemental materials download below)
- White cardstock, 1 sheet for every 3 children
Tools and Basic Supplies
Pre-Prep
- With the box, take 2 opposing top flaps and mark a point in the middle of each that is 1½ in. above the top of the box. Next, draw diagonal lines from those points down to the corners. Then cut along those lines to form triangular gables that will support the sloping roof.
- At the peak of each gable, cut a ¾-in. vertical slit for the jumbo craft stick (ridge beam) to fit in.
- Photocopy Matthew 7:24 Verse Cards onto ivory copy paper, then cut out 1 verse per child.
- Photocopy Door Pattern onto brown cardstock, then cut out the doors, 1 per child.
- Photocopy Window Pattern onto yellow cardstock, then cut out the windows, 4 per child.
- Photocopy Figurines onto white cardstock, then cut out 1 set for each child.
- Cut the white poster board into 6 x 7-in. pieces, then fold each piece in half to form cabin roofs. So that the roof will fit correctly, make sure the fold (ridge of the roof) runs parallel to the 6-in. side, not the 7-in. side.
- Use a hole punch to punch a chimney hole in each roof. The hole should be at a spot that is 1 in. from the fold and 1 in. from the edge.
- Cut the drinking straws in half, 1 piece per child.
- Spray paint the straw pieces gray or silver.
- Cut white batting into 6 x 7-in. pieces, 1 per child.
Teaching Tie-In
Have you ever been on ice or some other slippery surface? Did you fall? It's always nice to be on firm foundation!
Did you know the Bible has a lot to say about what a firm foundation it is? Listen to these awesome verses. Read Matthew 24:35, Psalm 119:89, and Isaiah 40:8.
No matter what happens—even when heaven and earth pass away, God's Word will never pass away. Wow! It will never change.
Today, we're making a little log cabin. You sure wouldn't want to build a cabin on a shifting or moving foundation like ice or sand, would you? When you play with your log cabin, it can remind you of how the Bible is a firm foundation!
Class Time Directions
- Take the box and fold the 2 opposing rectangle top flaps down inside the box. Then fold all 4 of the bottom flaps up into the box.
- Press the jumbo craft stick into the vertical slits in the 2 triangle top flaps so they stand straight up. Adjust the craft stick so it's evenly spaced.
- Take a pencil and on all 4 sides (and the gables) of your log cabin, draw horizontal lines about a ½ in. apart to look like logs. Go over the lines several times to darken them. Add additional lines to simulate wood grain.
- On the front and back of the cabin, along the left and right edges, top to bottom, draw ½-in. spirals to look like the ends of logs.
- On the front of the cabin, glue stick the door and 2 windows.
- On the left and right sides of the cabin, glue stick one window each.
- On the back of the cabin, glue stick the Matthew 7:24 verse.
- Apply glue stick to the white poster board roof, then press the white cotton batting onto the roof to look like snow.
- Slide the gray/silver straw piece through the cotton batting and through the hole in the roof far enough to form a chimney. Then, gently place the roof on top of the cabin.
- Cut out each of the paper figurines (dad, mom, sister, brother, etc.). Color them, then bend the tabs so they will stand on their own.
Tip Corner
- Consider using sandwich baggies to hold door, windows, jumbo craft stick, and figurines for each child.
- Although not as sturdy, white cardstock can be substituted for poster board.
- Some batting won't stick well to glue stick. In that case, use glue dots.
- White felt can be substituted for cotton batting. Or, use an unrolled cotton ball along the edges of the roof.
- Glue stick small strips of white paper to the window sills for an added snowy effect.
 Download PDF
- © 2024 Answers in Genesis
- Privacy Policy
- Contact
- About