
Kids Mode
This will turn off kids mode. Are you age 13 or older?
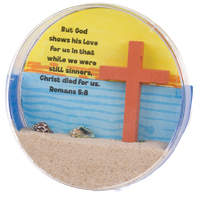
Mini Diorama
Day Four Craft
on February 7, 2022Materials
- Beach Scene Pattern
- 90-mm plastic Petri dishes, 1 per child
- Blue (1-mm thick) sticky back craft foam, one 6-x-1/2- in. piece per child
- White card stock, 1 sheet per 4 children
- Photo mounting squares, 4 per child
- Play sand, 1 1/3T. (1 T. and 1 t.) per child
- Mini seashells, 2 or 3 per child
- Optional: Magnet discs with adhesive backing,
- 2 per child
Tools and Basic Supplies
- Office paper cutter
- Yellow and orange washable markers
- Blue highlighters
- Glue sticks
- Scissors
Pre-Prep
- Use a paper cutter to cut craft foam into 6-x-1/2-in. strips, 1 per child. Then apply the strips along the outside rim of the Petri dish bases only (the smaller piece), 1 per child.
- Photocopy the Beach Scene Pattern onto white card stock, then cut out one circle and one cross per child. (See the Tip Corner for an alternative to the paper cross.)
Teaching Tie-In
Show the sample craft and say:
This mini diorama is such a cool beachy scene, isn't it? But the coolest thing about it is the Bible verse. Let's say it together. Do so. What do you think that means? Take answers.
God is love, and he has perfect love for us. He even showed us how much he loves us by sending his Son Jesus while we were still sinners! Can you imagine how hard that would be to give up your one and only son, knowing he would die? If you are ever feeling unloved or unlovable, remember that God loves you, and let it be a reason to be thankful to God! Now let's see how to make our mini diorama.
Class Time Directions
- Use a blue highlighter to color the ocean section (below the horizon line) of the beach scene circle.
- Use a yellow marker to color the sky section (above the horizon line) of the beach scene circle.
- Carefully and sparingly, add two or three lines or dashes of orange marker just above the horizon line.
- Glue stick the cross to the beach scene. The cross should be positioned to the right of the Bible verse with the horizontal crossbar just above the horizon line.
- Use mounting squares to attach the beach scene to the inside bottom of the base (smaller piece). The sea should be in line with the blue craft foam.
- Pour 1 T. and 1 t. of sand into the base on top of the beach scene. Then add 2 or 3 mini seashells.
- Place the lid (larger piece) on top of the base (smaller piece). Then gently and carefully press closed. The lid should fit snugly to prevent the sand from spilling out.
- Optional: Add a couple magnets to the back for display purposes. The test churches found that magnetic tape on a roll did not hold it sufficiently. Good magnet discs work well.
Tip Corner
- As an alternative to the paper cross, use a wooden cross. Wood Cross Beads (as pictured) can be ordered from Oriental Trading (#13706793).
- As an alternative to white card stock and mounting squares, use full sheet labels.
Related Downloads
Beach Scene Pattern
PDF DownloadMystery Island Deep Sea Science & Crafts

Kids love science experiments and crafts! This guide contains everything you need to coordinate the daily science experiments and crafts for all age groups.
Browse Kids Book- © 2024 Answers in Genesis
- Privacy Policy
- Contact
- About