
Astrophotography I
Astrophotography is the photography of astronomical objects. Being a professional astronomer, you might think that astrophotography is something I have done for a long time. However, I took this up only six years ago. Why did I put this off for so long? Part of the problem was that for many years I lacked the equipment to do this. Most astronomical bodies are very faint, so normal photographic techniques are not adequate to capture them. Long exposures are required, so a sturdy tripod is necessary, and, if using a telescope, a properly aligned and tracking mount is essential. The camera must have a high sensitivity, which means controllable ISO settings, something that was lacking in most of the cameras that I’ve owned.
And then there was the film. Film costs money. So does processing the film. And you have to wait until after the film was developed to see if the exposures were done right. That meant that the learning process was very slow and expensive. I didn’t purchase a 35-mm single-lens reflex (SLR) camera until about 30 years ago. An SLR camera is essential for astrophotography because only an SLR camera allows you to see exactly what the camera is photographing. Still, because of the impediments I just mentioned and a few other factors (such as manual focusing), I didn’t bother to attempt astrophotography.
In 2005 I purchased my first digital camera, a Nikon Coolpix. I was impressed with the color and resolution. I also was pleased with the instant gratification—the ability to look at what the photos looked like right away, allowing me to correct my shots with additional exposures. And I liked the price of photos—nothing! At least until I decided to print any of my photos. However, this was not a digital SLR camera. I took many thousands of photographs with this camera. I particularly liked the digital zoom that the Coolpix camera had (it probably was a predecessor to the P-900 and P-1000 cameras that many people like). I used the zoom at baseball games. I tried to get action shots of batters batting the ball, but there was a slight delay between when I would press the shutter button and when the photograph would be taken. That made it very difficult to take good action shots of batters batting the ball—I had to anticipate when the pitcher might release the ball and when the ball would reach the batter. Consequently, most of those photographs were lousy. I vowed that my next electronic camera would be an SLR.
That opportunity came shortly after the opening of the zip line course here at the Creation Museum. I took my camera along with me on a trip on the zip line. Halfway through, the sky opened, and we were drenched in a downpour. My digital camera never came back on again. Shortly thereafter, I purchased a Nikon D3200 digital SLR camera. After I had taken quite a few photographs with this camera, I finally decided to try my hand at astrophotography. My initial motivation was to obtain photographs that I could use to illustrate some of my work. My first target was the sun. I purchased a camera adapter to mate my camera to the 3.5-inch Questar telescope that we have at Johnson Observatory here at the Creation Museum. I remove the lens from the camera and use the adapter to attach the camera directly to the telescope. That way, the telescope is the camera lens. The Questar’s focal length is 1,300 mm, which makes for a whale of a telephoto lens.
My First Project: The Sun
WARNING: DO NOT ATTEMPT TO LOOK AT THE SUN OR TAKE PHOTOS OF THE SUN WITHOUT PROPER FILTERS.
It took me two years to figure out how to photograph the sun properly. Without any sunspots, the sun is boring, so the most interesting solar photos have spots. However, getting a good image of sunspots is not easy. Whenever I saw a good sunspot group, I would take photographs using an ISO setting and an exposure time that produced images that closely matched what I was seeing through the telescope. I was always disappointed by the results. There were dark spots, but they had no structure. I thought the problem was poor resolution, perhaps caused by vibrations set up by the shutter operating. Eventually I figured out what was really going on. The apparent disk of the sun (the photosphere) is much brighter than sunspots. The eye responds to light logarithmically, which compresses large differences in brightness. On the other hand, the camera responds linearly, which means that it records brightness differences in direct proportion to their brightness. The sun’s photosphere is so much brighter than the sunspots that light from the photosphere bled into the sunspots, overriding the subtle structure in sunspots.
How does one fix this? The solution is to underexpose the sun, either by reducing the ISO setting, reducing the exposure time, or both. This results in very dim, dull red images of the sun, but that prevents light from the much brighter photosphere invading the sunspots. Postproduction editing will restore the color and bring up the brightness of the photosphere yet preserve the structure of sunspots. Lacking Photoshop and the expertise to use it, when I need this done, I select a few photographs to send to my friend, amateur astronomer and pastor Jim Bonser, who regularly uses Photoshop to improve his astrophotography. Figure 1 shows the result of one of these collaborations. Notice the delicate structure in the sunspots, showing the darker inner portion (the umbra) and less dark outer portion (the penumbra).
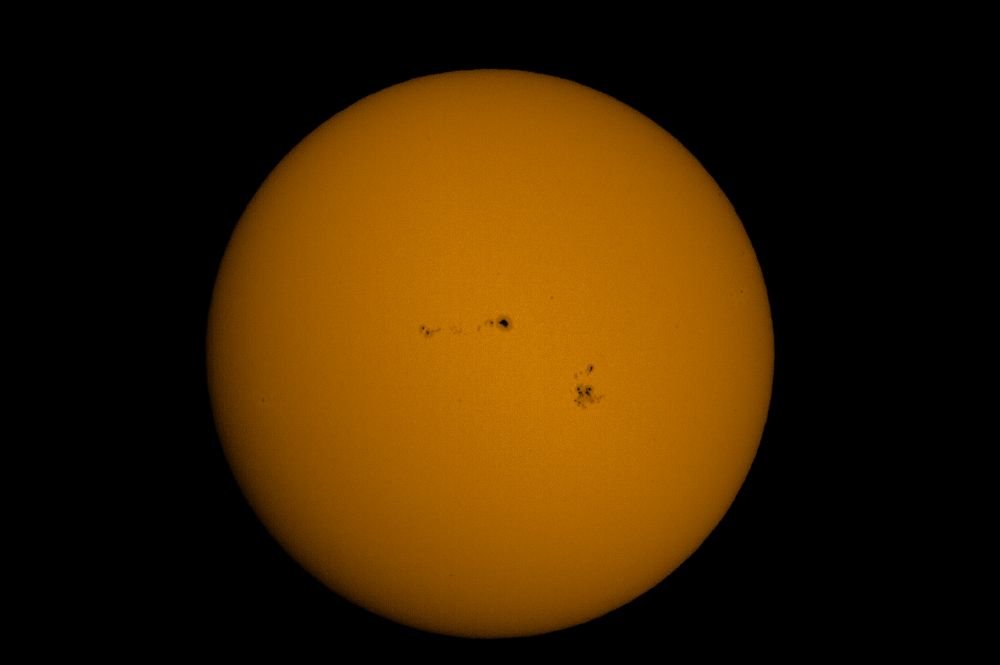
Figure 1. Sunspots on September 4, 2017.
Moving on to the Moon
I have experienced a similar problem with the moon. The photographs I take with the Questar are not quite as good as what I see when I look through the telescope. I have experimented with the same approach I took to improve solar photos, but with limited success. I’m not sure what the problem is. A related problem is that I would like to take closeups of the moon, but the 1,300 mm focal length of the Questar results in photographs in which the moon nearly fills the field of view vertically in landscape mode. Photographs of the planets are even less satisfying. The planets extend far less than an arcminute, while the vertical extent of a landscape image in the Questar spans more than 30 arcminutes. Consequently, the planets are very tiny in photographs I have taken. One solution is to crop and enlarge the images. However, in the original images, the planets occupy only a small portion of pixels available, so enlargement tends to make the images a bit blurry.
Another problem is that the Questar has a secondary mirror in the middle of the field of view. This reduces the amount of light that passes through the telescope, but not by much. The more important factor in viewing the moon and planets is that the secondary mirror amounts to a central obstruction around which light diffracts. Diffraction causes slight blurring in images. Refracting telescopes generally have no obstructions, so refractors tend to produce very crisp images of the planets. That is one reason why I’ve always like refractors over reflectors. We happen to have two refractors at the Johnson Observatory. The larger refractor is a 126-mm (five-inch) Televue. Televue telescopes are extremely well made and have fantastic optics. However, this refractor has only about half the focal length that the Questar has.
Televue makes a 4x Powermate. This device is a type of Barlow lens that effectively quadruples the focal length of the five-inch telescope. Last year, I asked for one of these for Christmas, and my wife kindly granted my request (though, due to backorder, my Powermate arrived weeks after Christmas). Figure 2 is a photograph of the moon that I took with this device. With such a long focal length, the entire moon will not fit in the photographs. However, if the lunar phase is no more than quarter phase, the entire lit part of the moon can be captured if the orientation of the camera is carefully chosen. Figure 3 shows a cropped and enlarged portion of the original lunar photo. I am very pleased with the results.
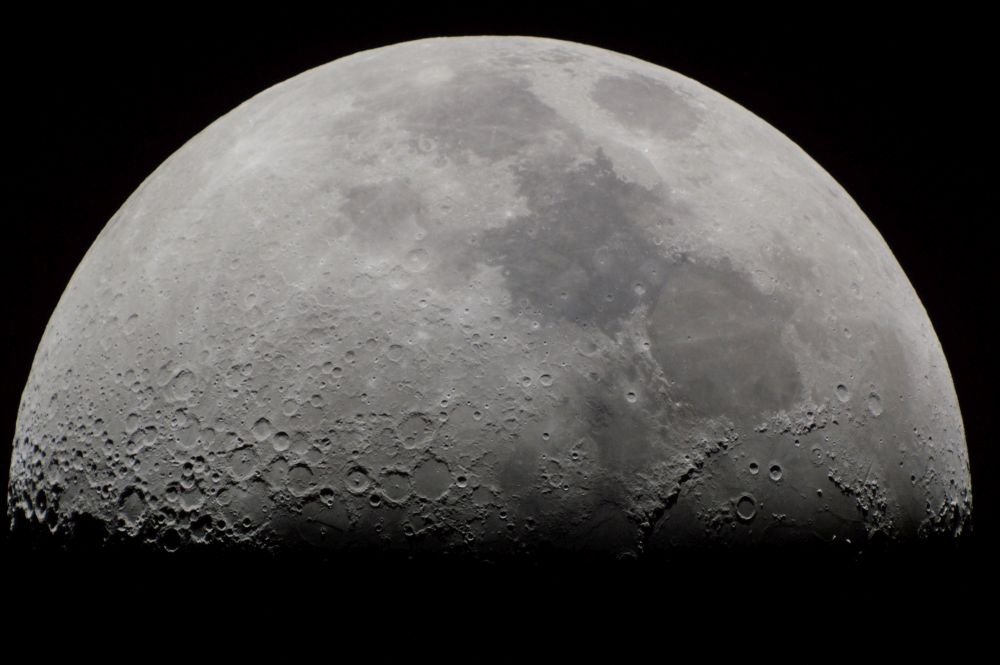
Figure 2. First quarter of moon on March 21, 2021.
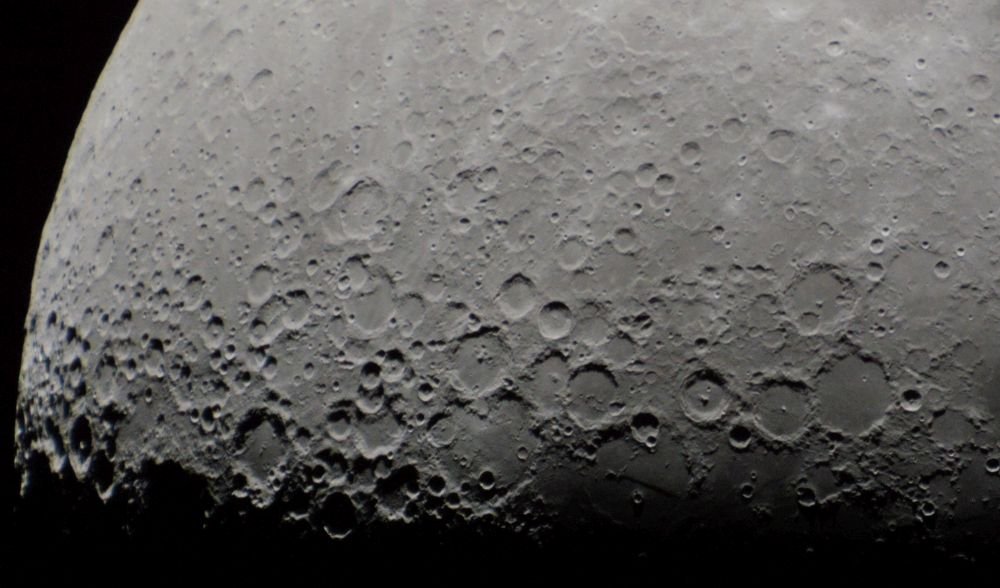
Figure 3. Closeup of first quarter of moon on March 21, 2021.
On to the Planets
I’ve also taken photos of Jupiter and Saturn with the Televue + Powermate combination. They illustrate how the eye and camera respond differently to light. Figure 4 is a very short exposure of Jupiter that I cropped and enlarged. As you can see, Jupiter is very tiny in this photograph, but you can make out two dark bands in the atmosphere of Jupiter. One easily sees these bands through the telescope (and better than this photograph shows—more about this later). However, the eye also sees the four Galilean satellites, or, if you will, moons of Jupiter. So why don’t the Galilean satellites show up in this photograph? The problem is that the exposure time is too short to capture the Galilean satellites. Figure 5 was taken with a long enough exposure to show the Galilean satellites. But notice that the dark bands in Jupiter’s atmosphere aren’t visible. This is because the exposure time was so long as to overexpose Jupiter, yielding it a blob of light.
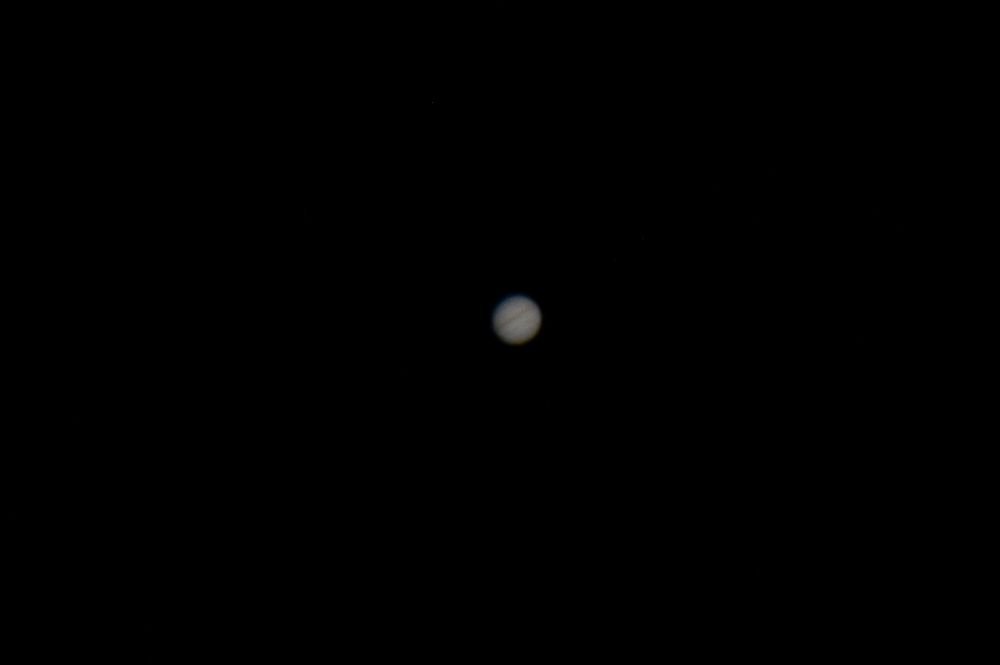
Figure 4. Jupiter.
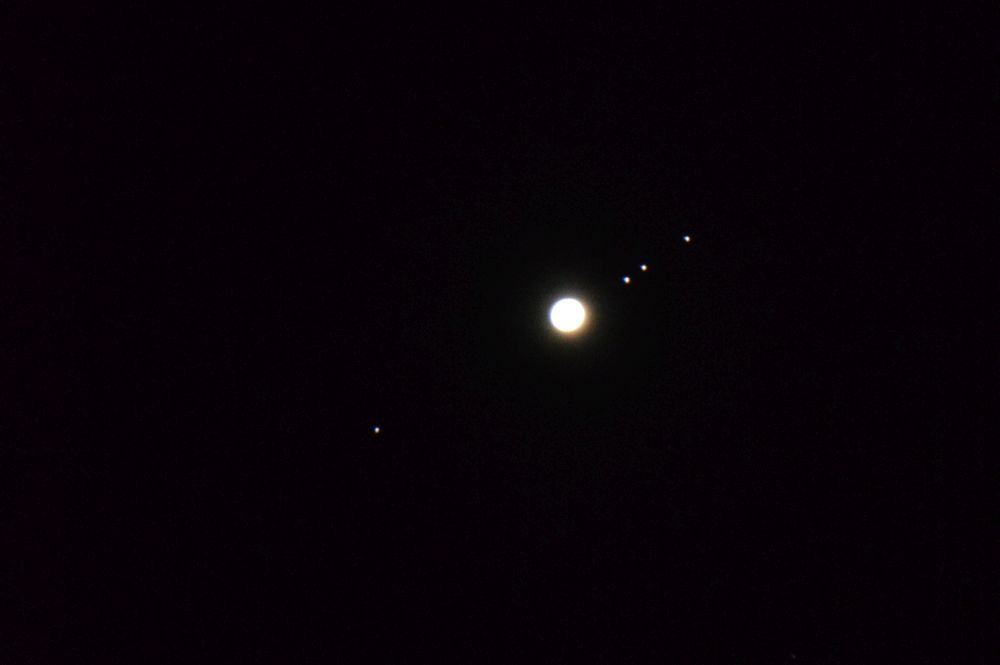
Figure 5. Galilean satellites.
Remember the difference in which the eye and camera respond to light? The eye’s logarithmic response permits us to simultaneously see atmospheric details on Jupiter as well as the fainter Galilean satellites. But the camera’s linear response will either reveal the atmospheric details of Jupiter or the Galilean satellites, but not both simultaneously. One must adjust the exposure time (and/or ISO setting) to record one or the other. Most people have no idea how differently cameras and our eyes respond to light. Contrary to popular misconception, the camera does not record exactly what the eye sees. Far from it.
The next two photographs illustrate the same principle when looking at Saturn. Figure 6 is a short exposure, in which the rings and some atmospheric details are visible. As with Jupiter, Saturn is very small in this photograph. Figure 7 is a longer exposure. The planet is so overexposed that the rings are not visible, though the oblong appearance is consistent with the rings being there. But notice that five of Saturn’s natural satellites are visible. I’ve indicated the names of the five. On a very dark, clear night, I can see all five of these satellites with this telescope. But at the same time, I see atmospheric detail, as well as Cassini’s division, a break in Saturn’s rings. No camera can do this.

Figure 6. Saturn.
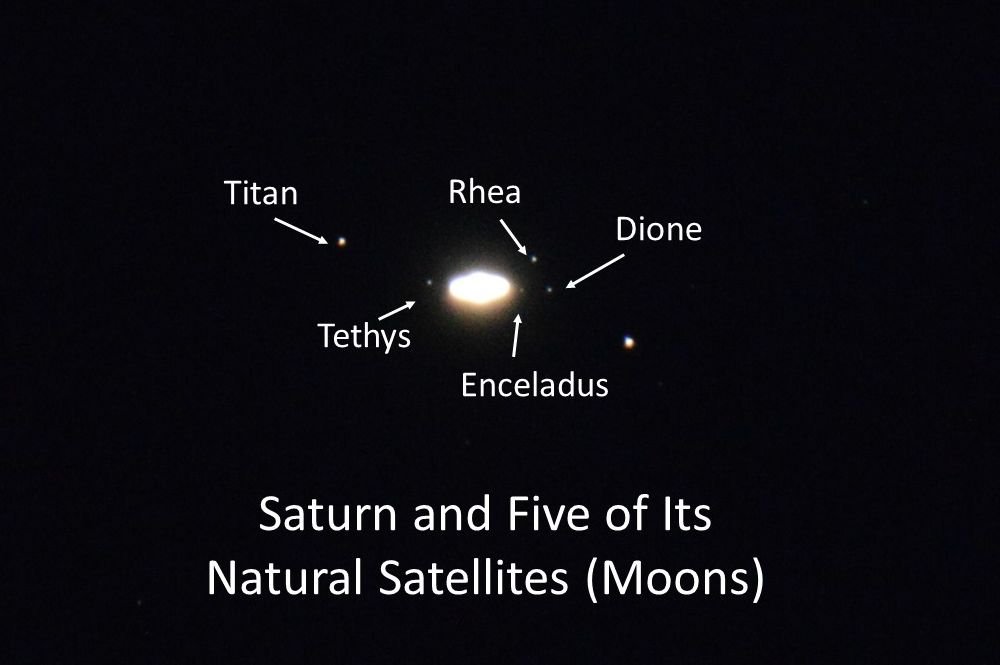
Figure 7. Saturn (annotated).
The detail of Jupiter and Saturn in these short-exposure photographs could be improved upon. Part of the problem is what I mentioned before—so few pixels spanned by planetary images. But there is another problem. We view the planets under a turbulent atmosphere. Light passing through the atmosphere is slightly refracted due to temperature variations. Turbulence causes the refraction to vary, which causes ever-changing blurriness in what we see. When I look at the planets through a good telescope, I see features that move in and out of view as my view oscillates between good and bad images. This happens very quickly, so even the short exposure times required to make images will span times of good and bad “seeing.” Thus, the photographs I’m likely to take with this equipment will never match what I can see through the telescope.
Since cameras could not record sharp details on planets, for many years the best images of the planets were drawings that astronomers, both professional and amateurs, made by viewing the planets for a very long time, waiting for moments of good seeing. But modern technology has solved the problem of atmospheric blurring. There are now small, specialized astronomy cameras that have many pixels crammed into the relatively small area spanned by the planets. These cameras are designed to take thousands of very short exposures. Because the exposure times are so short, the resulting images are very faint. And most exposures will be taken when the seeing is not so good, producing blurry images. But a few of the photographs will be taken during times of exceptional seeing. A computer program searches through the many thousands of images looking for those taken during good seeing. The program stacks those excellent images to bring up the brightness. Now amateur astronomers are taking planetary photographs that even professional astronomers could not take just a few years ago. I need to start my Christmas wish list.
Deep-Sky Objects
Along the way, I’ve tried my hand at taking photographs of deep-sky objects. Deep-sky objects are faint, extended objects, such as star clusters, nebulae, and galaxies. These require very long exposures. Rather than taking a single, long exposure, it is better to take a series of short exposures and stack them. Since I lack the expertise to do this, I farm this out by sending my photographs to Jim Bonser. Figure 8 shows results of one of these collaborations. This is M42, the Orion Nebula, one of the brightest deep-sky objects. This image is the result of stacking eight eight-second photographs, all taken with ISO 6400. Consequently, the effective exposure time is 64 seconds. My photograph captures the Trapezium, the four stars near the center of M42. It also captures some of the structure of the nebula. Overall, I’m happy with this image, until I compare it to some of the images Jim and other amateur astronomers have taken. Those make me wonder why I even bother.
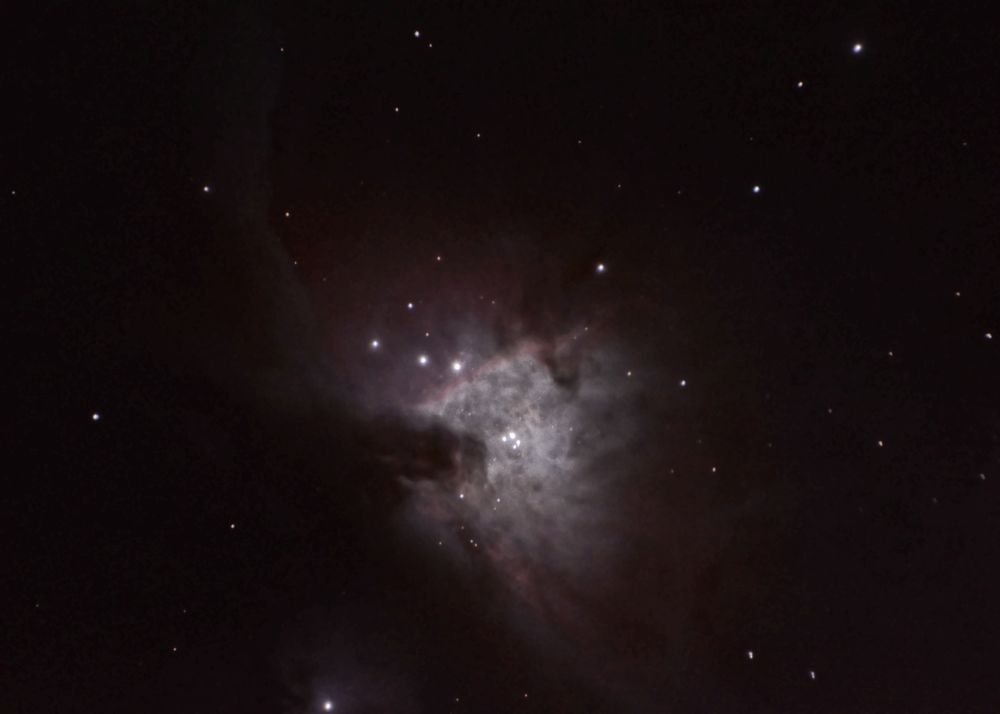
Figure 8. Deep-sky objects.
A New Direction: Forget the Telescope
After using the telescope to take astrophotos for a few years, I tried a new approach. Instead of attaching the camera to a telescope, I purchased a tripod and began taking photographs of the sky with my camera lens set at its widest field of view. I did some star trails by taking a half-hour exposure with the ISO set at 100 (the least sensitive setting). Figure 9 is one of these that I took at Grandview Camp in eastern Arizona, elevation 8,300 feet. The faint red and green glow near the horizon is an aurora. The aurora was too faint to be seen with the naked eye, but I noticed it in this very long exposure soon after I took it.
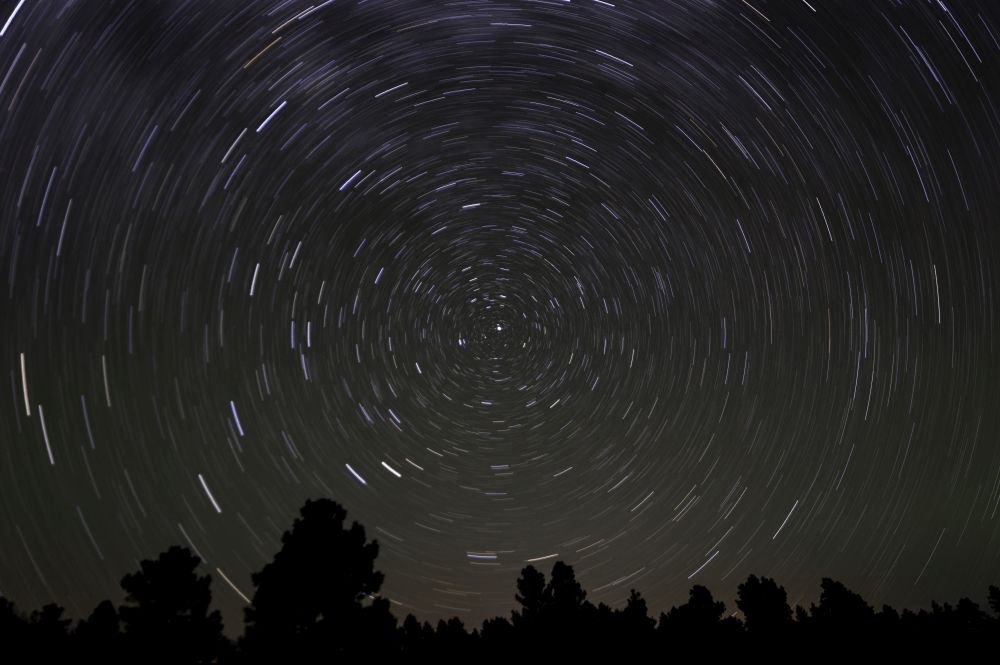
Figure 9. Star trails.
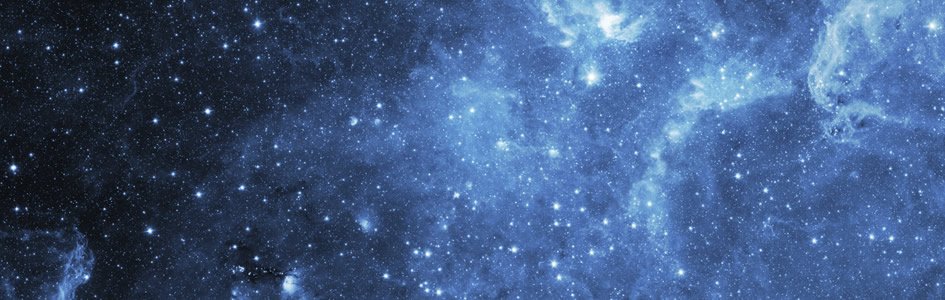
I also took some shorter exposure photographs with high ISO settings (usually 6,400) to capture images of the sky. Some of these were to capture meteors, while others were to get the Milky Way (Figure 10). I had to experiment with exposure times. Maximum exposure is desirable, but if the exposure is too long, the earth’s rotation will cause trailing. I’ve found that if the exposure time is no less than 15–20 seconds, the trailing is tolerable with my standard lens in the un-zoomed position. Buoyed by the success of these attempts, a couple years ago my Christmas wish list included a wide-angle lens to go along with my camera. This allows for even wider shots of the sky, which is very helpful when trying to capture meteors or the Milky Way.
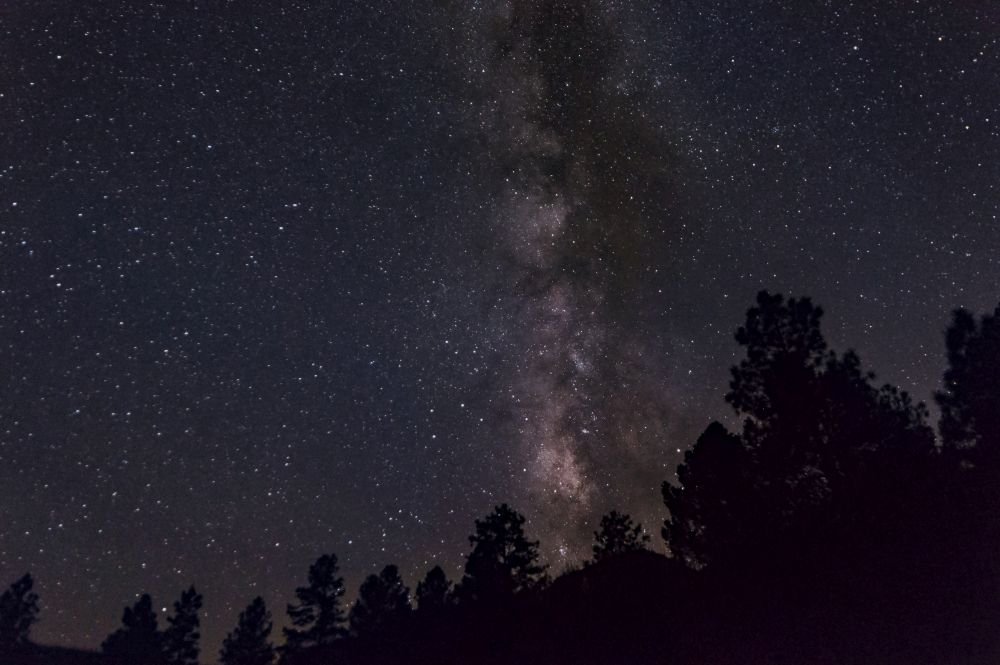
Figure 10. The Milky Way.
My astrophotography began with the goal of providing illustrations for some of my publications, and perhaps creating a library of astronomy images that creationists could similarly use. Many of the good astronomical images out there are copyrighted and so incur a cost when used, as well as requiring permission that often will not be granted for our purposes. However, I soon realized that my photographs could become the point of a publication in themselves. In addition to my astrophotographs, I’ve gathered astrophotographs from Jim Bonser and another amateur astronomer, both of whom are recent creationists and support the ministry of Answers in Genesis. I have a coffee-table book of some of these astrophotos, along with essays that I have written, that Master Books is publishing. I’ll have more to say about the book when it comes out soon.
Another New Direction
Two and a half years ago, my astrophotography went in a new direction. I began to take many photographs in succession to create time-lapse videos. I first did this in South Africa, where I spent a night in Kruger National Park. I had hoped to take advantage of the dark sky there to capture the stars circling around the south celestial pole, along with the marvelous southern Milky Way and the Magellanic Clouds, two satellite galaxies of our Milky Way Galaxy. Unfortunately, the moon was bright that night, which washed out the Milky Way and the Magellanic Clouds a bit. And then clouds moved in. Still, I took a few hundred photographs. I had no idea how I was going to make the video, so upon my return home, I asked a coworker in the AV department here at Answers in Genesis. He directed me to download a program to do this. It’s rather simple. You can see the result in this first video. The Magellanic Clouds are to the lower right, but they quickly get even lower and end up out of view. Notice that there is no “South Star” close to the south celestial pole. Also notice that the direction of rotation is clockwise. The occasional flashes of light on the trees are from taillights and headlights of cars moving about nearby.
Southern Hemisphere star trails.
Pleased with these results, upon my return home, I took about a hundred photographs of the northern sky over an hour to produce this second video. You can see the North Star above a point of the roof on my house, with the Big Dipper off to the upper left. This turned out well, especially considering the light pollution of the greater Cincinnati area. Notice that the rotation is counterclockwise, opposite that in the Southern Hemisphere. Both motions are in the same direction—east to west. The difference is that in the Northern Hemisphere we are looking one direction (north), but in the Southern Hemisphere we must turn around and look the other direction (south). There are two distinct points in the sky around which the sky appears to spin. That is why we call them the celestial poles.
Northern Hemisphere star trails.
I’ve since done much experimenting with making astronomical time-lapse videos. I’ll share some of those in a future blog.
Support the creation/gospel message by donating or getting involved!

Answers in Genesis is an apologetics ministry, dedicated to helping Christians defend their faith and proclaim the good news of Jesus Christ.
- Customer Service 800.778.3390
- Available Monday–Friday | 9 AM–5 PM ET
- © 2026 Answers in Genesis